Last Updated on April 15, 2024 by Ryan
Table of Contents
What is a home inspection?
When entering the realm of property acquisition, a comprehensive home inspection is a pivotal step that assures the buyer of the quality and safety of their investment. This process, also known as property inspection or building inspection, is not just a formality; it’s a critical examination that can save substantial costs and headaches in the future.
The real estate inspection encompasses a thorough check-up of the property’s physical structure and systems, from the foundation to the roof, carried out by a qualified home inspector. This expert assesses everything visible and accessible to ensure that all aspects of the house are in good working condition. The culmination of this scrutiny is the inspection report, a document that details the inspector’s findings and highlights potential issues.
Typically, an inspection is recommended immediately after a purchase offer is accepted but before the sale is finalized—a stage known as the pre-purchase inspection. This timing allows potential homeowners to back out of a sale if significant defects are discovered, or alternatively, negotiate repairs or price adjustments based on the inspection results.
Engaging in this process not only clarifies what repairs the property requires but also gives a clearer picture of its worth. For anyone looking to buy a home, understanding these general inspection concepts is essential. They ensure that you’re not just buying a property but investing in a home that stands firm both structurally and financially.
Home Inspections are a crucial step in the process of buying or selling a home. They serve as an in-depth examination conducted by a professional inspector who assesses the property to identify any existing or potential issues. This thorough inspection covers various elements of the house including the structure, foundation, roofing, plumbing, electrical systems, heating and cooling systems, and overall condition of windows and doors.
For buyers, a home inspection provides a safety net by revealing problems that may not be visible during a typical house viewing. Issues such as structural damage, outdated wiring, or hidden mold can lead to significant expenses if unnoticed. By understanding these issues beforehand, buyers can negotiate repairs or price adjustments with the seller, or even decide to walk away from a problematic deal.
Sellers also benefit from home inspections as they can address any major issues before listing the property. This proactive approach can enhance the home’s marketability, reduce time on the market, and potentially increase the sale price. It also minimizes the chances of surprises that could derail a deal later in the selling process.
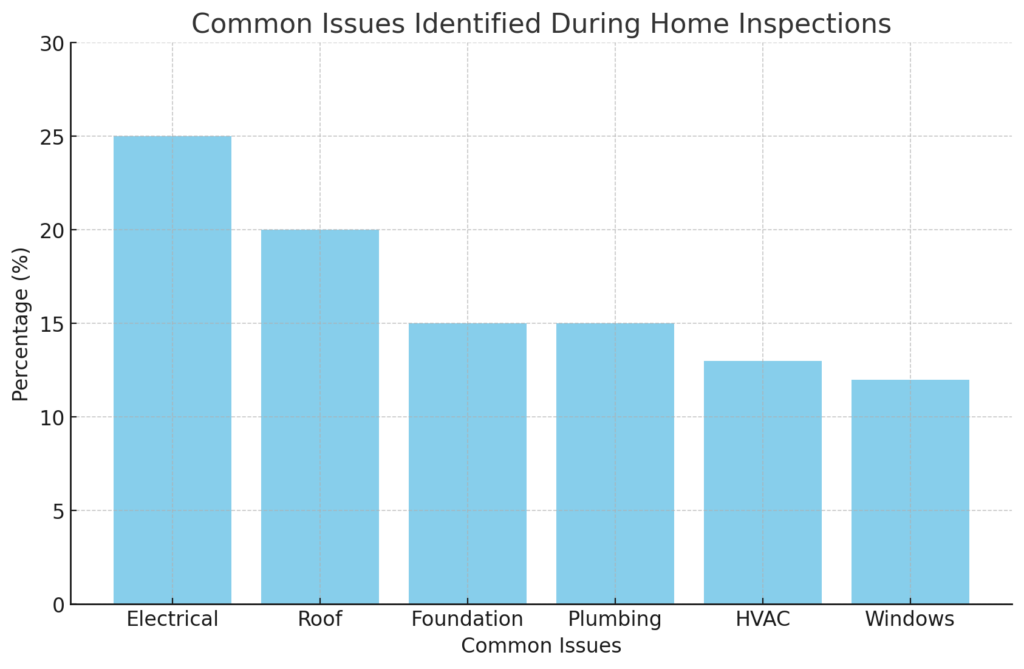
Common Issues Identified during a home inspection
Here are some popular terms and their definitions related to home inspection:
- Radon Testing – Radon testing involves measuring the levels of radon gas in indoor environments due to its health risks. Radon is a colorless, odorless radioactive gas, and testing is crucial because high levels can increase the risk of lung cancer. The testing can be done using either passive or active devices and is critical for ensuring safe indoor air quality.
- Mold Inspections – Mold inspections are necessary to detect the presence of mold within buildings. Mold can grow on any organic material in the presence of moisture and can cause health issues such as allergies and respiratory problems. Inspections often involve visual assessments and may include sampling the air, surfaces, or materials to detect mold growth.
- Foreclosure Inspections – This topic doesn’t have a direct link to Wikipedia, but it generally refers to inspections conducted on properties that are being repossessed by banks or lenders. These inspections assess the condition of the property before it is put up for sale.
- Four Point Inspections – While not specifically detailed on Wikipedia, four point inspections are evaluations typically required by insurance companies before insuring older homes. They focus on four main areas of interest: HVAC (Heating, Ventilation, and Air Conditioning), electrical wiring and panels, plumbing connections and fixtures, and the roof.
- Disaster Inspections – This topic also lacks a specific Wikipedia link, but it generally involves the evaluation of property and infrastructure after a natural disaster, such as a hurricane, earthquake, or flood, to assess damage and plan for recovery and rebuilding.
- Section 8 Inspections – This type of inspection, also known as the Housing Quality Standards (HQS) inspection, is required for housing units that are part of the Section 8 program in the United States. The purpose is to ensure that rental properties funded through the program meet minimum safety and health standards.
Or Have a Question?
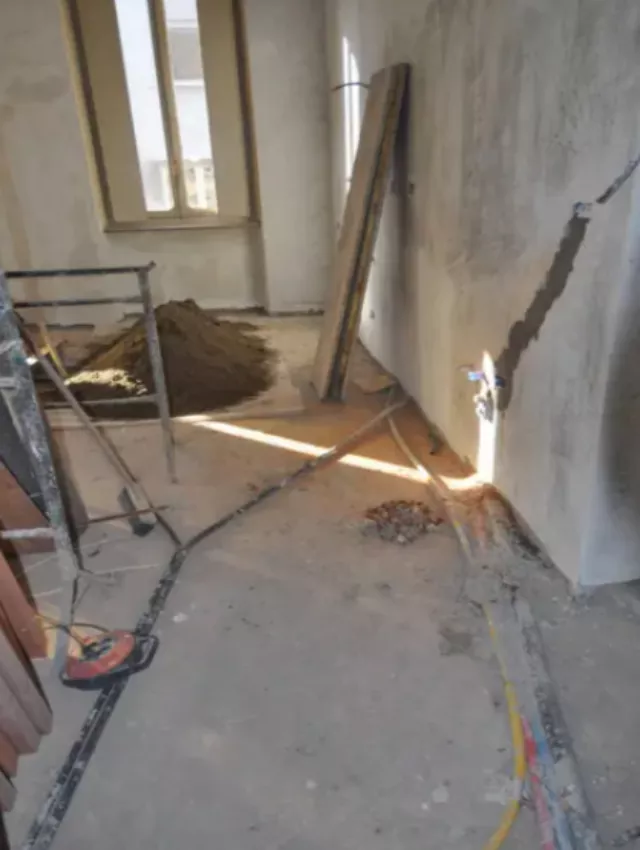
Inspecting Foundation Walls and Piers
Slab Inspection
A slab inspection is a comprehensive review that assesses the overall condition and structural integrity of a concrete slab. It focuses on evaluating various aspects such as structural soundness, compliance with building codes, general safety, and the identification of defects like cracks or spalling.
This type of inspection also checks for moisture issues and ensures that the slab meets all required specifications for durability and safety. Its main goal is to ensure that the slab is structurally safe and fit for its intended use, looking at both visible signs of distress and potential hidden problems.
In contrast, a slab leveling inspection specifically targets the evenness and levelness of the slab. This focused inspection is crucial for determining whether the concrete surface is flat and uniform, identifying any deviations that could affect the functionality of the space, such as uneven floors that can cause tripping hazards or improper drainage.
Tools like laser levels are used to precisely measure flatness and detect areas that might require correction through leveling techniques. This type of inspection is essential for maintaining the usability and aesthetic appearance of concrete floors, particularly in settings where precision and uniformity are critical.
Creating a slab inspection checklist involves listing various aspects that need to be examined to ensure the quality and safety of a concrete slab. Here’s a comprehensive checklist you can use for slab inspection:
Pre-Inspection Preparation
- Review Project Specifications: Understand the requirements, dimensions, and the type of concrete mix specified.
- Check Compliance Documents: Ensure all necessary permits and compliance documents are available and valid.
- Gather Inspection Tools: Equip with necessary tools such as tape measure, level, laser meter, and crack width gauge.
Site Condition Check
- Weather Conditions: Note the current and recent weather conditions as they affect curing times and concrete integrity.
- Site Accessibility: Ensure the site is accessible for inspection without safety hazards.
- Storage of Materials: Check that all materials, especially cement and aggregates, are stored properly to avoid contamination.
Formwork Inspection
- Alignment and Stability: Ensure the formwork is properly aligned and stable.
- Condition of Formwork: Check for damages or deformities in the formwork.
- Formwork Cleanliness: Verify the formwork is clean and free from standing water and debris.
Reinforcement Inspection
- Bar Placement: Confirm that all reinforcement bars are correctly placed as per the design drawings.
- Bar Size and Type: Verify the size, type, and grade of the reinforcement bars.
- Spacing and Cover: Check the spacing between bars and the concrete cover over the reinforcement.
Concrete Placement
- Mix Verification: Confirm the concrete mix meets the specification.
- Consistency and Workability: Assess the consistency and workability of the concrete before it is poured.
- Pouring Technique: Ensure concrete is poured and spread uniformly without segregation.
- Vibration: Check that the concrete is adequately vibrated to remove air pockets.
Post-Pour Inspection
- Surface Finish: Inspect the surface finish for uniformity and smoothness.
- Initial Curing: Ensure that the concrete is kept moist and covered after pouring to begin the curing process.
- Edge Formation: Examine the edges and corners for proper formation and stability.
Quality Control Tests
- Slump Test: Perform a slump test to measure the consistency of the concrete.
- Compressive Strength Test: Schedule or review results of the compressive strength tests.
- Crack Inspection: Check for any premature cracking or surface defects.
Safety and Compliance
- Safety Measures: Ensure all safety protocols are being followed during the inspection.
- Documentation: Keep detailed records of the inspection findings and any deviations from the plan.
- Sign-off: Final approval or rejection based on compliance with the specifications and overall inspection findings.
This checklist is designed to ensure thorough evaluation of a concrete slab from preparation to post-construction, covering all critical aspects for maintaining structural integrity and compliance with construction standards.
Slab leveling inspection
What is a Slab Foundation in Building Structure?
A slab foundation consists of a concrete layer, usually 4 to 6 inches thick at the center. This concrete slab is commonly set on a layer of sand, which serves for drainage or acts as a buffer. Homes constructed with slab foundations do not have crawlspaces, eliminating any space beneath the flooring.
Explore our detailed article on “What is a Slab Foundation in Building Structures” here.
A slab leveling inspection checklist is essential for assessing the condition of a concrete slab and determining if leveling is required. Here’s a comprehensive checklist for conducting a slab leveling inspection:
1. Preliminary Assessment
- Documentation Review: Verify any existing floor plans, previous inspection reports, and repair history.
- Visual Inspection: Look for any signs of uneven floors, visible cracks, or shifts in the structure.
2. Surface Condition
- Crack Mapping: Document the location, direction, and size of all visible cracks.
- Spalling Areas: Check for areas where the concrete has chipped away.
- Water Pooling: Note areas where water accumulates, indicating potential low spots.
3. Level Measurements
- Use of Leveling Tools: Utilize laser levels, digital levels, or water levels to assess the flatness and evenness of the slab.
- Check Diagonals and Perimeters: Measure discrepancies in the slab’s diagonals and perimeters to identify variance in level.
4. Structural Integrity
- Core Sampling (if applicable): Extract core samples for deeper analysis of the concrete composition and internal cracks.
- Load Testing: Conduct controlled load testing to observe real-time slab response.
5. Underlying Issues
- Soil Stability: Check for soil displacement or erosion beneath the slab.
- Root Intrusions: Inspect for roots that may be causing upheaval or displacement of the slab.
- Drainage Inspection: Ensure proper drainage around the slab to prevent water-related issues.
6. Previous Repairs
- Quality of Repairs: Evaluate the quality and effectiveness of previous repair work.
- Compatibility of Materials: Ensure that materials used in repairs are compatible with the existing slab.
7. Report Generation
- Findings Summary: Summarize the findings with detailed notes and photographs.
- Recommendations: Provide recommendations based on the inspection, including potential leveling techniques and preventive measures.
8. Follow-Up
- Scheduling Repairs: Propose a timeline for necessary repairs or further inspection.
- Monitoring Plan: Suggest a monitoring plan to observe changes in the slab over time.
Each of these steps should be thoroughly documented with photographs, measurements, and notes to provide a clear and actionable report. This checklist will help ensure that all important aspects of slab inspection are covered, leading to effective maintenance or repair solutions.
Concrete inspection
Inspecting a concrete slab in a built home requires careful attention to several key aspects to ensure its integrity and suitability for long-term use. Here’s a detailed checklist you can use for your inspection:
1. Visual Inspection
- Surface Condition: Check for cracks, spalling (surface breakdown), or flaking. Note the size and extent of any damages.
- Level and Flatness: Verify that the slab is level using a laser level or traditional bubble level. Check for any uneven areas or slopes.
- Water Pooling: Look for areas where water might collect, indicating unevenness or depressions in the slab.
2. Crack Assessment
- Crack Width: Measure the widths of any cracks. Cracks wider than 0.3 mm can be problematic.
- Crack Direction: Observe the direction of the cracks (straight, zigzag, etc.) as this might indicate the type of stress (e.g., shrinkage, thermal expansion).
- Crack Depth: If possible, assess how deep the cracks go, which might require specialized tools or professional judgment.
3. Moisture Inspection
- Dampness: Check for signs of moisture on the slab surface. Moisture can indicate poor drainage or underlying water issues.
- Efflorescence: Look for white powdery deposits which suggest that water is moving through the concrete and evaporating, leaving mineral deposits behind.
4. Structural Integrity
- Load Bearing: Assess if the slab can support the expected load (furniture, internal walls, etc.) without excessive deflection or damage.
- Foundation Check: Ensure that the slab foundation has no signs of settlement or movement. Look around the edges and at the corners for any signs of sinking or upheaval.
5. Surrounding Area
- Drainage: Check the drainage around the slab. Ensure that water is directed away from the slab to prevent water damage and structural issues.
- Vegetation: Note any large trees or vegetation close to the slab. Roots can grow under the slab and cause lifting or cracking.
6. Material Quality
- Concrete Mix: If information is available, review the type of concrete mix used, as some mixes are more prone to issues like cracking or spalling.
- Reinforcement: Determine if there’s reinforcement (like rebar or wire mesh), especially if cracks or structural issues are found.
7. Repair History
- Previous Repairs: If there have been previous repairs, assess the quality and durability of these repairs. Poorly repaired cracks or patches can indicate underlying problems.
8. Compliance with Specifications
- Building Codes: Verify that the construction of the slab meets local building codes and specifications, which can affect insurance and resale value.
9. Use of Specialized Tools
- Concrete Hardness Tester: Use a concrete hardness tester to check the compressive strength of the concrete.
- Moisture Meter: Use a moisture meter to get a quantitative measure of the moisture content in the concrete.
10. Professional Assessment
- Consult a Structural Engineer: If you find significant issues, it might be wise to consult with a structural engineer who can provide a more detailed analysis and recommendations.
This checklist is comprehensive and covers the most critical aspects of concrete slab inspection. Depending on the slab’s age and your specific concerns, some points may need more emphasis than others.
This checklist will help you conduct a thorough inspection of your water heater tank. Regular checks and maintenance can significantly extend the life of the heater and help avoid costly repairs.
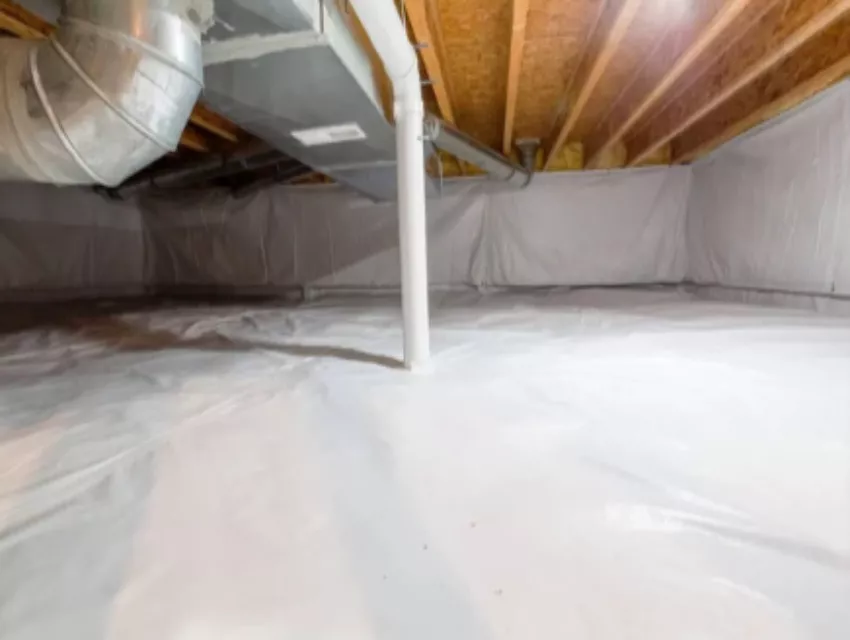
Inspection of Crawlspaces
Preparation and Safety
- Wear protective clothing, including gloves, goggles, and a respirator.
- Ensure there is adequate lighting.
- Have a tool kit ready with a flashlight, moisture meter, screwdriver, and camera.
Access and Initial Assessment
- Locate and safely access the crawlspace entry.
- Assess the overall condition from the entry point before fully entering.
- Check for any obvious signs of pests or rodents.
Moisture and Water Damage
- Use a moisture meter to check for elevated moisture levels.
- Inspect for signs of water pooling or leaks.
- Look for mold, mildew, or fungal growth.
- Verify the condition of insulation and whether it’s wet or deteriorating.
Structural Integrity
- Examine the foundation walls for cracks or breaches.
- Check floor joists and beams for any signs of rot, mold, or pest damage.
- Ensure that supports and piers are secure and upright.
Ventilation and Insulation
- Assess the adequacy of ventilation to prevent moisture accumulation.
- Check that vents are clear and unobstructed.
- Evaluate the condition and installation of insulation, ensuring it covers all necessary areas without blocking vents.
Piping and Electrical Systems
- Inspect visible plumbing for leaks or corrosion.
- Examine electrical wiring and fixtures for signs of damage or unauthorized modifications.
- Look for any signs of HVAC ductwork issues, such as disconnections or sagging.
Pest Inspection
- Look for signs of termites, rodents, or other pests.
- Check for droppings, nesting materials, or damaged wood.
- Inspect vapor barriers for rips or displacement that could invite pest entry.
Final Evaluation
- Take detailed notes and photographs for records.
- Assess any findings that require further professional inspection or immediate repair.
- Determine the frequency of future inspections based on the crawlspace condition.
Inspecting Means of Egress
The building owner or agent is required to inspect the means of egress to ensure it is maintained free of obstructions, and correct any deficiencies found prior to opening the building to the public.
Inspecting Means of Egress check list:
General Requirements
- Paths Clearly Marked: Ensure that all exit routes are clearly marked and visible.
- Obstruction-Free: Check that pathways are free of any obstructions that could impede an exit during emergencies.
- Proper Lighting: Verify that all exit routes are well-lit, especially near steps and turns.
- Signage: Confirm that exit signs are clearly visible and illuminated, pointing towards the nearest exit.
- Width of Egress Paths: Make sure the width of egress paths complies with local regulations, allowing for safe passage of all occupants.
Doors
- Operability: Ensure that doors along exit routes are easily operable without special knowledge or tools.
- Locking Mechanisms: Check that doors are not equipped with any locking mechanisms that could prevent exit.
- Swing Direction: Verify that doors swing in the direction of exit travel.
- Panic Hardware: Confirm that panic hardware is installed and functional where required.
Stairs
- Condition of Stairs: Inspect stairs for any structural damages or issues that could cause falls.
- Handrails: Ensure that handrails are present on both sides and are securely attached.
- Step Dimensions: Check that the rise and run of steps are consistent and within regulatory limits.
Emergency Lighting
- Functionality: Test emergency lighting to ensure it operates correctly and provides adequate illumination during power outages.
- Battery Backup: Verify that emergency lights have functioning battery backups.
Special Areas
- Accessibility: Confirm that means of egress are accessible to individuals with disabilities, including the presence of ramps and accessible doors where required.
- High Hazard Areas: Inspect areas with high hazard contents to ensure they have additional safety measures in place.
- Egress from Different Levels: Check that egress routes from basements and upper floors are adequately marked and accessible.
Maintenance and Drills
- Regular Maintenance: Confirm that all components of egress routes are regularly maintained and tested.
- Evacuation Drills: Check records of evacuation drills to ensure they are conducted regularly and effectively.
- Documentation and Compliance: Review documentation to ensure compliance with local fire codes and safety regulations.
By thoroughly inspecting each of these items, you can ensure that all means of egress in a building are safe and effective, ready to function as needed in an emergency.
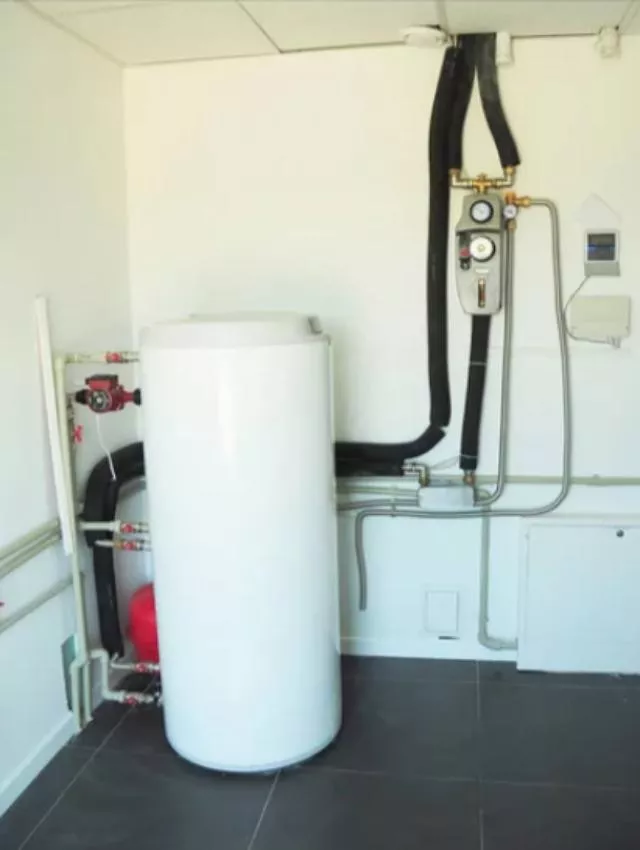
Inspecting Water Heater Tanks
Visual Inspection
- Overall Condition: Check for signs of rust, corrosion, leaks, or any damage on the tank’s exterior.
- Area Around the Tank: Ensure the area is clear of any flammable materials and has adequate clearance for ventilation and service access.
Safety Features
- Pressure Relief Valve: Ensure it is functional and not leaking. Test by lifting the valve slightly to see if water is released, then it should close without further leaking.
- Temperature Settings: Confirm that the temperature is set to a safe level, typically around 120°F (49°C) to prevent scalding.
Water Supply
- Check for Leaks: Inspect all connections, fittings, and pipes leading to and from the tank for any signs of leakage.
- Water Quality: Check for discoloration or sediment in the water, which might indicate rusting or sediment build-up inside the tank.
Heating System
- Type of Heater: Note whether it’s electric, gas, or solar. Inspect relevant components based on the type:
- Electric: Check the condition of the heating elements and electrical connections.
- Gas: Inspect the burner, pilot light, and gas connections for proper function and signs of wear.
- Solar: Ensure solar panels and associated plumbing are in good condition.
- Thermostat Operation: Verify that the thermostat is operating correctly by checking if the water temperature matches the setting.
- Anode Rod
- Inspection: The anode rod protects the tank from corrosion. Check if it’s depleted and replace if more than 50% corroded.
Drain Valve
- Functionality: Open the drain valve to flush out sediment from the tank. This helps improve efficiency and prolongs the tank’s life.
Insulation
- Insulation Quality: Check if the tank and associated piping are properly insulated to maintain heat and increase efficiency.
Ventilation (for gas water heaters)
- Vent System: Inspect the venting system for blockages or leaks to ensure it is drawing exhaust gases safely away from the home.
Seismic Straps (if applicable)
- Check Straps: In earthquake-prone areas, verify that seismic straps are installed and securely fastened.
Documentation and Compliance
- Maintenance Records: Review any available maintenance records to keep track of past inspections and services.
- Local Codes: Ensure the installation complies with local building codes and safety regulations.
Inspect for Moisture Intrusion
General Inspection
- Visual Inspection: Look for visible signs of water damage such as stains, mold growth, and water spots on ceilings, walls, and floors.
- Odor Detection: Notice any musty or moldy smells, which often indicate hidden moisture.
Exterior Inspection
Roof Check:
- Inspect shingles, tiles, or other roofing materials for damage or gaps.
- Check for blocked or clogged gutters and downspouts.
- Ensure there is no standing water on the roof.
Foundation and Basement:
- Look for cracks or gaps in the foundation walls.
- Check for signs of water pooling around the base of the house.
- Inspect basement walls and floors for dampness or water leakage.
Windows and Doors:
- Ensure all seals around windows and doors are intact.
- Check for any condensation between double-paned windows.
Interior Inspection
Attic:
- Check for any signs of leaks, especially after rainfall.
- Inspect for adequate ventilation to prevent moisture buildup.
Walls and Ceilings
- Use a moisture meter to check for elevated moisture levels in the walls.
- Look for peeling paint or wallpaper, which can indicate moisture issues.
Floors
- Check for warping, buckling, or discoloration on wooden floors.
- Inspect carpets for dampness or musty odors.
Plumbing
- Inspect all visible plumbing for leaks or corrosion.
- Check under sinks, around toilets, and near water heaters.
Equipment Needed
- Moisture Meter: Essential for detecting hidden moisture within walls and other surfaces.
- Flashlight: Useful for inspecting dark or shadowed areas.
- Ladder: Necessary for roof and high area inspections.
Follow-Up
- Document Findings: Take photos and make notes of any signs of moisture intrusion.
- Consult a Professional: If moisture issues are identified, consider consulting with a professional for further assessment and repair.
Following this checklist can help you identify potential moisture issues before they become major problems. Remember, addressing moisture intrusion promptly can prevent more extensive damage and costly repairs in the future.
Advanced Electrical Inspection Training
Service Panel Inspection
- Check for any signs of overheating or corrosion.
- Ensure the service panel has adequate capacity for the home’s needs.
- Verify proper labeling of all circuit breakers.
- Inspect for proper grounding and bonding.
Circuit Breakers and Fuses
- Ensure all circuit breakers are the correct size and type for their circuits.
- Check for any signs of arcing or overheating.
- Verify that there are no double-tapped circuit breakers unless the breaker is designed for it.
- Inspect for the presence of any outdated fuses.
GFCI (Ground Fault Circuit Interrupter) and AFCI (Arc Fault Circuit Interrupter)
- Test all GFCI outlets to ensure they are functioning properly.
- Check that GFCI devices are installed in areas with moisture (kitchen, bathrooms, outdoors, etc.).
- Verify that AFCI protection is in place for appropriate living areas.
Outlets and Switches
- Test all outlets and switches for proper operation.
- Check for loose or damaged outlets and switch plates.
- Ensure that outlets have appropriate polarity and are not reverse wired.
- Inspect for any signs of burning or overheating.
Light Fixtures
- Verify that all light fixtures are securely mounted and operational.
- Check for any exposed or frayed wiring.
- Ensure that bulbs are the correct wattage for their fixtures.
Wiring Condition
- Inspect visible wiring for signs of wear, fraying, or damage.
- Ensure wiring is properly secured and protected.
- Check for any outdated wiring methods that may no longer be safe or compliant.
Smoke and Carbon Monoxide Detectors
- Verify that smoke and carbon monoxide detectors are present and properly located throughout the home.
- Test detectors to ensure they are operational.
- Check the expiration dates on all units, as they should be replaced every 10 years.
Electrical Appliances and HVAC System
- Inspect the condition of visible wiring and connections to major appliances.
- Ensure that large appliances are connected to dedicated circuits.
- Check the HVAC system for proper electrical connections and function.
Outdoor Electrical Systems
- Inspect outdoor lighting and outlets for proper weatherproofing and operation.
- Verify that electrical systems used in outdoor areas (like pools and hot tubs) have appropriate safety features and grounding.
Overall Safety Check
- Look for any DIY wiring or unprofessional repairs.
- Ensure there is easy access to all electrical panels.
- Check for any electrical hazards like wires running under rugs or looped over nails.
Exterior Inspections
Fundamentals of Inspecting the Exterior
Roof
- Check for damaged or missing shingles or tiles.
- Inspect for signs of leaks, especially around chimneys, vents, and skylights.
- Ensure gutters and downspouts are securely attached and clear of debris.
Foundation
- Examine for cracks or shifts in the foundation.
- Look for signs of water pooling or improper drainage around the base of the home.
- Check for any signs of mold, rot, or deterioration.
Exterior Walls
- Inspect the siding or brick for damage, cracks, or signs of wear.
- Check for adequate caulking and sealing around windows and doors.
- Look for peeling paint or other signs of age and weathering.
Windows and Doors
- Check for cracks or breaks in glass.
- Ensure that all windows and doors seal properly to avoid drafts and water leaks.
- Inspect frames and sills for signs of wood rot or decay.
Drainage and Grading
- Ensure the ground slopes away from the foundation to prevent water damage.
- Check for any blockages or issues in the drainage systems.
- Inspect for any erosion or signs of settling near the foundation.
Decks and Porches
- Inspect for loose boards, unstable railings, or other structural issues.
- Check for rot or insect damage in wood structures.
- Ensure that all stairs and railings are secure and meet safety standards.
Garage
- Check garage door opener and ensure it is functioning properly.
- Inspect for proper sealing around garage doors.
- Look for signs of wear or damage on the garage structure.
Inspecting HVAC Systems
General Inspection
Documentation Review:
- Check for proper installation manuals, maintenance records, and warranties.
- Ensure compliance with local codes and regulations.
Visual Inspection:
- Examine the overall condition of the units.
- Look for any visible signs of damage or corrosion.
Burners
- Clean burners to remove dust and debris.
- Ensure even and efficient burning.
Safety Controls:
- Test safety and limit switches.
- Verify proper operation of the thermostat.
Cooling System
Condenser and Evaporator Coils:
- Clean coils to ensure unrestricted airflow and heat exchange.
- Inspect for signs of leaks or damage.
Refrigerant Levels:
- Check refrigerant levels and look for signs of leaks.
- Ensure refrigerant type and charge match system requirements.
Fans and Motors:
- Lubricate bearings and check motor operation.
- Ensure fan blades are intact and securely attached.
Air Distribution System
Ductwork:
- Inspect ducts for leaks, obstructions, or insulation issues.
- Ensure ducts are properly sealed and insulated.
Vents and Grilles:
- Check that air supply and return vents are unobstructed.
- Clean vents and grilles to ensure optimal air flow.
Electrical Components
Wiring and Connections:
- Inspect electrical connections for tightness and signs of overheating.
- Ensure proper grounding of the unit.
Controls and Switches:
- Test operation of all switches and controls.
- Calibrate thermostats and other control systems as needed.
Energy Efficiency
System Calibration:
- Verify that all HVAC controls are calibrated and functioning at optimal settings.
- Check energy management systems for proper operation.
Insulation and Sealing:
- Inspect insulation on refrigerant lines and heat exchangers.
- Ensure windows, doors, and other openings are well-sealed.
Safety and Compliance
CO and Smoke Detectors:
- Test carbon monoxide detectors and smoke alarms in areas affected by the HVAC system.
- Replace batteries or units as necessary.
Regulatory Compliance:
- Ensure the system meets all local environmental regulations.
- Check for updates on safety standards and implement necessary changes.
Final Review
Conduct a system performance test to ensure everything operates as expected.
Inspect the Attic, Insulation, Ventilation and Interior
Attic Inspection
Access and Safety:
- Ensure safe and easy access to the attic.
- Check for secure flooring and absence of hazards.
Structural Integrity:
- Inspect roof trusses and rafters for signs of distress, cracking, or sagging.
- Examine the chimney and vent stacks for proper sealing and condition.
Pest and Animal Signs:
- Look for evidence of rodents, insects, or other pests (e.g., droppings, nests, damage).
Insulation
Depth and Uniformity:
- Check that insulation is evenly distributed and has the appropriate depth as per local building codes.
- Ensure there are no gaps or compressed areas reducing effectiveness.
Type and Condition:
- Identify the type of insulation used (e.g., fiberglass, foam, cellulose) and assess its condition.
- Look for signs of moisture, mold, or deterioration.
Vapor Barrier:
- Verify that a vapor barrier is present and correctly installed to prevent moisture transfer from the living spaces to the attic.
Ventilation
- Ensure that intake vents in soffits and exhaust vents at the roof’s peak are unblocked and functional.
- Check for balanced ventilation to avoid moisture and heat buildup.
Intake and Exhaust Vents:
Vent Screens:
- Inspect screens for blockages or damage to prevent pest entry.
- Ensure vents are of adequate size and number based on attic space and local codes.
Ductwork:
- Check any HVAC ducts running through the attic for insulation and proper sealing.
- Look for signs of leaks or condensation.
Interior (Attic Floor/ Ceiling of Living Space)
Ceiling Integrity:
- Check the ceiling below the attic for stains, cracks, or signs of water damage.
- Ensure that any penetrations (light fixtures, fans) are properly sealed.
Electrical Systems:
- Examine wiring for signs of wear, proper insulation, and secure fastening.
- Ensure there are no open junction boxes or improperly managed cables.
Fire Safety:
- Verify that any penetrations through floors and walls are properly sealed to hinder the spread of fire.
- Check for the presence and condition of smoke alarms.
Final Assessment
Review all findings for potential risks or needed repairs.
Deck Inspections
For a comprehensive yet focused deck inspection checklist, the following key areas should be thoroughly examined:
Overall Structure:
- Check for any signs of rot or decay.
- Inspect support posts and joists for structural integrity.
Surface and Decking:
- Look for cracked, warped, or loose boards.
- Ensure all boards are securely attached.
Railings and Banisters:
- Verify that railings are stable and secure.
- Ensure the spacing between balusters is consistent and safe.
Stairs:
- Check for stability and security of the entire staircase.
- Inspect for wear or damage on treads and risers.
Fasteners:
- Examine all screws, nails, and other fastening devices for rust or corrosion.
- Ensure all fasteners are tight and not missing.
Cleaning and Maintenance:
- Look for signs of mold, mildew, or fungus.
- Ensure the deck is clean and free of debris.
Inspecting Asphalt Shingle Roofs
Shingle Condition:
- Check for missing, cracked, or curling shingles.
- Look for blistering or granule loss.
Flashing:
- Inspect flashing around chimneys, vents, and skylights for damage or rust.
- Ensure that flashing is securely attached and sealed.
Gutters and Downspouts:
- Ensure gutters are clean, properly aligned, and securely attached.
- Check for shingle granules in the gutters, which indicate wear.
Roof Valleys:
- Look for debris accumulation that can impede water flow.
- Inspect for signs of water damage or leaks.
Ventilation:
- Check for proper attic ventilation to prevent heat and moisture buildup.
- Ensure vents are clear and unobstructed.
Structural Integrity:
- Examine the roof for sagging or signs of structural compromise.
- Check for signs of water staining or mold in the attic.
Inspecting Tile Roofs
Tile Condition:
- Check for cracked, broken, or missing tiles.
- Look for any tiles that have slipped out of place.
Flashing:
- Inspect flashing around chimneys, vents, and skylights for damage or inadequate sealing.
- Ensure all flashing is intact and properly installed.
Underlayment:
- Check for signs of underlayment deterioration if visible, such as through gaps or damaged tiles.
- Look for any exposure or wear that could compromise the roof’s waterproofing.
Debris and Blockages:
- Remove any debris like leaves or branches that have accumulated on the roof.
- Ensure that valleys and gutters are clear to allow free water flow.
Mortar and Sealants:
- Examine mortar on ridges and hips for cracking or loosening.
- Check the condition of sealants and caulking, especially in joints and around protrusions.
Structural Integrity:
- Check for any signs of uneven roof planes or sagging.
- Inspect the roof deck from the attic for any signs of moisture, rot, or mold.
Appliance Inspection
Refrigerators:
- Verify that the temperature settings are correct (usually 37°F for the fridge and 0°F for the freezer).
- Check for consistent cooling and look for any frost buildup or leaking water.
Ovens and Stoves (Gas and Electric):
- Ensure all burners and heating elements are functioning correctly.
- Check for even heating and temperature accuracy.
- Inspect for gas leaks on gas models.
Dishwashers:
- Run a cycle to make sure it completes without issues.
- Check for leaks and proper drainage.
- Ensure the spray arms and filters are clear of debris.
Washing Machines:
- Test for proper operation of cycles.
- Inspect for leaks, especially at hose connections.
- Check for excessive vibration or noise during operation.
Dryers (Gas and Electric):
- Ensure that the dryer heats up and that the timer functions properly.
- Check the lint trap and venting system for blockages.
- Inspect for proper drum spinning and noise levels.
Microwaves:
- Test the appliance with a simple heating task (e.g., heating water).
- Ensure the door seals properly and the turntable rotates.
HVAC Systems:
- Check for proper airflow and temperature control.
- Inspect the condition of filters and replace if necessary.
- For cooling systems, check the refrigerant levels.
Inspect Fireplaces, Stoves, and Chimneys
Visual Inspection:
- Check the exterior of the chimney for cracks, damage, or signs of wear.
- Inspect the chimney cap and crown for integrity and proper sealing.
Fireplace and Stove Structure:
- Examine the firebox of fireplaces and stoves for cracks, gaps, or deterioration.
- Ensure that the damper operates correctly and seals tightly when closed.
Flue and Liner:
- Check the flue liner for any visible damage, blockages, or significant soot accumulation.
- Verify that the flue is clear of obstructions and excessive creosote buildup.
Ventilation:
- Ensure that the area is properly ventilated to allow for safe exhaust and air intake.
- Check for proper draft to ensure smoke is drawn up the chimney efficiently.
Hearth and Surrounding Area:
- Inspect the hearth and areas around the fireplace or stove to ensure they are free of combustible materials.
- Check for any signs of heat damage or discoloration on nearby walls or flooring.
Safety Equipment and Accessories:
- Verify the presence and condition of a spark guard or fireplace screen.
- Ensure that carbon monoxide detectors and smoke alarms are functional and located appropriately.
Or Have a Question?
- https://www.investopedia.com/terms/h/home-inspection.asp
- https://www.investopedia.com/articles/mortgages-real-estate/08/home-inspection.asp
- https://www.zillow.com/sellers-guide/bad-home-inspection-for-sellers/
- https://www.homelight.com/blog/buyer-what-are-home-inspectors-not-allowed-to-do/
- https://www.homelight.com/blog/buyer-home-inspection-cost/